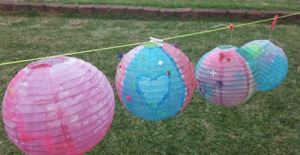
Illuminations Festival – how to make a lantern
This year the festival has been extremely well supported by local schools and community groups and as a result around 580 lanterns have been made and/or decorated for the parade, including some spectacular large scale lanterns.
However, of course everyone is welcome to join the lantern parade, and if you want to bring along your own lantern you are more than welcome to! Here’s a quick guide to how to put together your own lantern. The only rule is – no naked flames!
Here are some guidelines put together by the festival organisers…
HOW TO DECORATE YOUR BOUGHT LANTERN
For RE/MAX Advantage Illuminations Festival 2016
Materials and Prep:
• Mix some food coloring in a dish as dark or light as you like with water + a
splodge of PVA like a dessert spoon. The PVA stops the food coloring from
running in the event of rain
• Silicone Baking Paper, Scissors, Glue Stick, Tissue paper, Brush/ Foam Brush
Stage 1: Open your lantern and assemble
Stage 2: Tear about 15 – 20 cm from silicone baking paper. Fold into about a 5cm
square and cut into a simple shape. eg: a heart, a circle, a leaf etc. Use glue stick and
adhere to the lantern as tightly as possible.
Stage 3: Paint food coloring wash over top….the paper will resist and make sure there
is a bit of white on the lantern…..Also you don’t have to cover all of it. It should dry in the
sun or breeze in 10 – 15 mins
Stage 4: Use the tissue paper in the same way as stage two to finish off. You can add
felt pen and sparkle-arkle!
Finishing: Attach an LED torch to the top of your lantern. The keychain small globes are
easy to attach and quite effective. You can then attach this to a bamboo garden stick
and you are ready to join the fun.
That’s the basics….of course you do what you’d like to do, because it’s lovely to see lots
and lots of different lantern looks.
[posts_carousel cats=””]